Sunday, September 20, 2020

Knowing Kali Linux for OSCP


Kali Linux is developed and maintained by the offensive security professional. It is a Debian-based Linux distribution focus at advanced Penetration Testing and Security Auditing. All the programs packaged with the operating system have been evaluated for suitability and effectiveness. Kali contains several hundred tools that are geared towards various information security tasks, such as Penetration Testing, Security research, Computer Forensics, and Reverse Engineering.
Kali Linux comes with preinstalled most of the popular pentesting tools like Penetration Testing with Kali Linux Metasploit for network penetration testing, Nmap for the port, and vulnerability scanning, Wireshark for monitoring network traffic, and Aircrack-ng for testing the security of wireless networks.
This the reason why most of the hacker and pentester uses Kali Linux by offensive security. I know it is not to be the best distro for everyday use but for pentesting it is convenient, yes you could just download the tools on your other favorable distro but it might be just an unnecessary hassle for you.
Knowing Kali Linux for hacking if like "Give me six hours to chop down a tree and I will spend the first four hours on sharpening the axe ".The same relationship is seen between kali Linux with hacking.


How much to know for 'OSCP'


In Simple words more you know better for you, it is difficult to tell that how much you need to know, similarly like in our class exams we have a book from which we know the important topics to cover but at last, the question paper is decided by the examiner so going in the exam with this topics benefits you but for your 100% performance you know what to do. So let's understand each topic overview.


Wednesday, September 9, 2020

Windows and Linux for OSCP

OSCP(offensive security certified professional) in this certification mainly two types of operating systems play an important role in my opinion first is Linux(Server/Client) and the second is Windows(workstation/server). You may encounter other machines with different OS but the probability is very low.


Let’s understand why Linux is the most installed OS in the world, which is mainly because android uses Linux as its OS. It is leading in almost all the market except in the desktop market, where the windows come into play. I know windows covers almost all the Market but Linux as an open source project have its benefits honestly speaking Linux is just the kernel in the GNU/Linux[link] operating system. Many users in the starting find difficult to understand the working as you have done almost all the task manually with terminal whereas on other side windows provide a good GUI interface to interact to do the same task with just one click.

I know if you are a dedicated Linux user it is very unlikely to use windows back again but whether you like or not windows is the most common operating system for the desktop in the current state so as a Pentester or Ethical hacker its necessary to understand windows more you know about it easier for you in future to pentest the machine.

From an infosec point of view, there are two reasons why we should learn Linux. The first is that the majority of all servers in the world are running on Linux based servers and if we are Pentesting a Linux server then we must understand the OS functioning before, the second reason is that the vast majority of all Pentesting tools are only available on Linux based OS especially Kali Linux which is designed for this purpose specially.
In this blog, we look at some of the basics topics of windows machine which i think are necessary to learn and understand the terminology used inside. I am only covering the term which we need to know for this certification because there is lot to cover but this will help you to visualize the bigger picture so without any further delay let's start.

How Much you have to know about windows?

These are topics which i believe you must know about before Pentesting Windows machine.

  • CMD
  • Powershell and scripting
  • Active Directory(*)
  • Registry
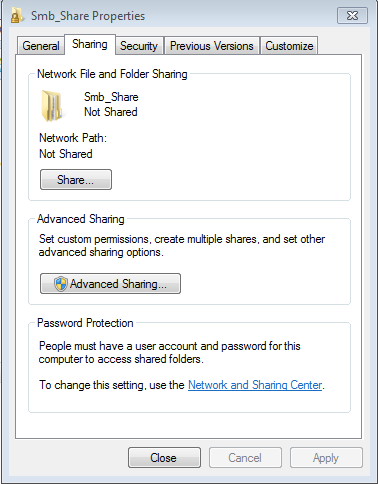
  • Directory structure, File system, and operating system functioning of windows
  • Group policies 

Let me discuss each one by one.

CMD: command-line interface of windows it is not as powerful as Linux terminal. If you like Linux terminal to do your stuff then you may like Cmd to do your task also. During the Pentesting of windows machine sometimes we only have a command-line interface to interact with machines against GUI it clearly explains its importance as suppose you got a shell of windows client machine but with it, you only have limited functionality then cmd is your best friend for further process.

Group Policies: It is basically the policies which are implemented on a single system or on a group of system, it is one of the main feature of the Active directory. Suppose you have a company with a large number of desktop users using windows machine then how do you think you apply restriction and policies on the system to reduce the workload then Group policies come into play. The basic Strategy is centralized Group Policy administration, which works only in conjunction with Active Directory.

Active Directory: This is the Major topic we should be looking on ‘Active Directory’ organizes company complete hierarchy from which computer belongs on which network to what your profile picture looks like It runs on Windows Server and allows administrators to manage permissions and access to network resources and it also decides which users have access to the storage area. System are present in large numbers and all systems are using AD in almost every sector of IT, therefore, it is important to Understand the AD and how it configures in the windows machine.

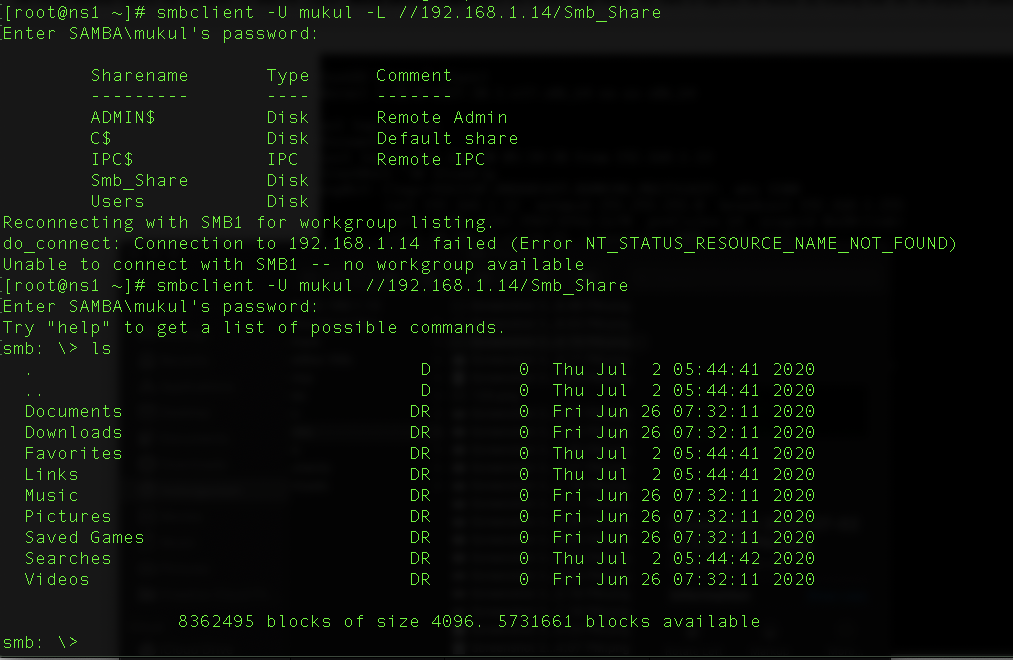
Registry: During the enumeration phase of the windows machine we may encounter the Registry. Registry is like a hierarchical database that stores low-level settings for windows operating systems meaning the kernel, device, drivers, and services all use the registry to store the key meaning that whenever any program, device, driver and service we configure a new subkey containing settings such as a service’s location, its version, and how to start the program, are all added to the windows registry.

Powershell: Powershell is a command-line shell and scripting language specially made for windows machine to helps windows administrator somewhere similar to bash scripting in Linux we leverage Powershell to run malicious code, with Powershell pentester can stealthy gather internal user data and exploit it. Some of the benefits we get from knowing PowerShell are writing and debugging scripts in Powershell, connecting to windows target, transferring files.

Directory Structure and file system of windows OS: In windows operating system the root directory is usually “C:\” and the directory separator is “\”. \Program Files and \Program Files (x86) are most common directory for Pentester to use.

How much Linux we know for OSCP

This is a nice question there are two things to consider when are Pentesting a machine whether it is Windows or Linux, we always have our Kali Machine to perform Pentesting In ‘ready to hack state’, therefore, consider your kali machine as tools to perform your task on client-side, the point is if you are not able to fully understand your operating system and its tools to perform your task how do you suppose to know that you are doing your job completely, consider this kali as your friend and try to get along with it use on regular basis try to get familiar with it. its feel difficult in starting but as time goes on eventually you like Linux more than other OS
So this debian-derived Linux distribution is all we have, deep knowledge of kali is always pays off to Pentester in future. The second case is when we encounter Linux machine in client-side as a server commonly(Red Hat Enterprise Linux) or maybe as workstation during Pentesting.

For Further knowing about Kali Linux refer to Knowing kali post.

SecurityThread

Start Your Ethical Hacking Ride

Followin


Saturday, July 4, 2020

Install Nessus Essentials on kali Linux

Installing Nessus Essentials is very easy as compare to other vulnerability scanners. All you have to do is just visit the Nessus Tenable download page and download Nessus .deb file kali Linux compatible with your system architecture.

Here I am using 64-bit architecture link: https://www.tenable.com/
After downloading the file, it in the Download folder
Navigate to the folder using the command: cd /Downloads/
then de-package the Nessus folder and install using the command: dpkg -i Nessus-8.8.0-ubuntu910_amd64.deb 

During downloading to will see Unpacking Nessus Scanner core components

    - you can start Nessus scanner by typing  /etc/init.d/nessusd start 
    - Then go to https://hostname:8834/ 


Then just start the Nessus using this command: /etc/init.d/nessusd start
And after that navigate to https://hostname:8834 

Add the security certificate after that this screen pop up select the product type you want to install here i select Essential and press continue


To start with Nessus Essential you need an activation code and to get activation code you must have to register yourself first on Tenable as shown in the image.


Then you get an activation code on your registered email address, just enter it on the activation page and press continue 


Create a user name and password for your account and press submit.

Then Nessus start Downloading its plugins as shown in image it takes time so be patient 


Friday, July 3, 2020

Configuring SMB(samba) client and server on CentOS 7


First, let's configure the Samba client on centOS

Open your machine terminal and start with installing smb client using yum
Command: yum install samba-client
Now to use CentOS as a client we must have another machine which acts as a server for our machine I choose Windows 7 you may choose another OS, a little bit of steps may change but the concept is the same almost.
Now in windows create your shared folder and assign the permission according to your purpose.
I created a folder inside my c drive named Smb_Share, then just right-click to properties to share the folder.


Sharing folder inside the network for smb

Now get back to your Centos Machine and type this command in terminal. smbclient -U mukul -L //192.168.1.14 where -U is for user and -L is for host


smbclient command

After knowing the folder name now we can directly access the folder using command smbclient -U mukul //192.168.1.14/Smb_Share


After getting inside the machine use “?” command to know different commands


help for Smb

use get command like get filename to download any file to our system and the important thing is that file downloaded inside the directory from which you make a connection like here I make a connection from /root directory so all file downloaded inside this directory.
if you have write permission then you can also use the mkdir command to make a directory inside the shared folder here I create a demo directory.


making directory in smb

Use can use the “mget” command to download multiple files from smb client.“Lcd” command is used for seeing current directory list like ls command in terminal.
put” command is similar to get command but instead of downloading it upload the file to the server. And for multiple files use “mput”(m=multiple).
del filename” command is used to delete the file “deltree Pictures\desktop.ini ” commands helps to delete the desktop.ini file so with deltree we can delete the directory inside the file.
Smbget” command if you know the file name then without making the whole connection you can use smbget to directly download the file. As shown in the image.
smbget -U mukul smg://192.168.1.14/Smb_Share/iecompat.dll


how to use smbget command in smb

All these methods are good only when your interaction with the shared folder is limited or maybe one or two times a day but what will happen if your interaction with the shared folder is on regular basis therefore sometimes network administrator mount the shared folder on system to make it easier for all to access it and sometimes users are not such qualified in all the things to make it accessible for all time. So the only solution remained to permanently mount the folder to the user system.
Before mounting we must know about Common Internet File System (CIFS) which is a network filesystem protocol used for providing shared access to files and printers between machines on the network. A CIFS client application can read, write, edit, and even remove files on the remote server.
To download it use: yum install cifs-utils
Now to mount : mount -t cifs //192.168.1.14/Smb_Share -o user=mukul,password=123 /mnt/data


permanent mount

where the user is mukul and password is 123, -t type of file system which is cifs, the Smb_Share folder is mount to the /mnt/data folder. To verify it use the command: df -h
Now navigate to /mnt/data to the folder to see the mounted shared folder


The last thing remaining is to permanently mount the shared folder.


fstab file for permanent mounting

vim /etc/fstab use this command to open fstab file and edit this file like I showed in the above image. Here I use vim text editor you can use anyone and also you can add password just right to user=mukul but I choose not too. then just save and exit. type mount -a command to crosscheck. after this, if the machine restarts, the mounted folder remains mounted.


Configuring the samba(smb) on CentOS 7 and using the windows machine as a client.

Start with installing a package for samba: Yum install samba*
2. Create the shared folder and put the data inside it, which you wanna share. Gives permission to that folder according to your need. Like I create smb_data folder with permission 777 in a recursive manner but I suggest you to use 775 permission chmod -R 0775 smb_data/ just crosscheck with ls -lha command


creating folder for samba

3. Add the users which you want to access the data like I create smbuser1 then create its password and smbpassword for security purposes. For more users, you can make a group of people and add members to this group and assign permission accordingly.


adding user to access samba folder

4. Now the main step is to edit the smb.config file inside /etc/samba/smb.conf using any text editor add these lines as shown in the image.
[data]
comment = smb_data
path = /root/smb_data
public= yes
writable = yes
user list = smbuser1


smb config file

here path decides the path of our shared folder, public=yes means available to people inside the network, writable means giving write permission, and user list the users which can access this shares folder.
5. Allow the port to make a connection with Windows machine you can use firewalld but I mostly prefer iptables so I edit vim /etc/sysconfig/iptables and allow 445 port then restart the iptables service using systemctl restart iptables.service and to check whether the port is open or not use iptables -n -L command
6. Just restart the smb service systemctl restart smb.service
7. Now on client windows machine use run to access the shared folder by typing IP of centOS server \\192.168.1.12 and authenticate the smbuser1


run in windows

8. Now the most important step Enjoy because smbuser1 is here….


Sunday, June 28, 2020

Dns Server


DNS server domain resolver of your website Name. It is a name resolution service. DNS server resolves domain address(www.example.com) into IP address which is called forward lookup in technical term and it is also used to resolve the IP address to the domain name which is called reverse lookup.
  • the lookup mechanism used to map an IP address to the domain name and vice-versa. the resolver DNS server is over the world they are in a distributed manner to reduce the load on a specific server. these servers dynamically modify and update their records as a new domain registered every second.
  • Now the question arises that we need the DNS server because domain names are easier to remember instead of IP addresses.  

Parts of DNS

  1. Namespace: Database contains all the information- delegations, zones,  domains.
  2. Servers: Makes the namespace available for clients-serves
  3. Resolver: Will query the servers about a particular namespace and find out the particular information of that namespace.


Types

1.Authoritative Servers (Responsible to give reliable answers for certain zones
     Master(Primary)
     Slave(Secondary)
2. Caching/Recursive Server

The cache text file contains names and addresses of root DNS servers that are needed to resolve names outside of the authoritative DNS domains. Root DNS Server is a group of a number of servers that are authoritative to resolve queries at the root level.

In Windows Server: /Windows/System32/Dns/cache.dns

In Centos: /etc/bind/db.root


DNS Working

when the user opens up the browser and type any website name and search for it than before opening the website DNS server comes into play because the internet works on IP address, not on a domain name, therefore, it became necessary for some to map this domain name into IP address. For this, the user query first passes to its local DNS first about the website IP address. The first process is that web browser searches for IP address inside its local cache file as I mentioned above if the cache file can't find IP address then it asks the local DNS server for IP.

Let's understand in brief

1. Client: searches securitythread.blogspot.com

2. Local DNS searches inside the DNS cache file for IP Address if found return to the browser if not then query passes to the local DNS server for further steps

3. Local DNS asks to roots server for IP but root server only contains top-level Domain like .com,.org,.net hence it only gives IP address of .com server in our case.

4. Then local DNS ask to .com server for the IP address of securitythread.blogspot.com but .com server only able to give the nearer public DNS server IP address like we use 8.8.8.8 for google.com

5. Public DNS server gives the IP address of securitythread.blogspot.com  to our local DNS server which is further passed to the browser.


DNS Structure

It is like a hierarchical structure as shown: 

key-term to understand:

HOSTNAME:  www.securitythread.blogspot.com

FULLY QUALIFIED DOMAIN NAME(FQDN):  www.securitythread.blogspot.com

FQDN= Hostname + Domain name 

www.securitythread.blogspot.com = www+securitythread.blogspot.com

Top-level Domain(TLD)

Generic top-level domain = .org, .com, .edu

Country code top-level Domain = .in, .uk, .usa

DNS structure


DNS QUERY

Query is a name resolution request from the local DNS server to point out the IP address of the given website.

Types: Iterative and Recursive

Iterative: Query which directed towards the DNS server and answered with many intermediate refereed servers.

Recursive: Query sent to a DNS server requires a complete answer there is no other DNS referral server


DNS Server types

Authoritative: Master(primary)

                        Slave(secondary)

Non-Authorative: Our own cache server

The major difference is that the primary server resolves the query with its own database. whereas non-authoritative server doesn't resolve the query with its database, actually refer the query to another DNS server for resolving.

Primary(master) DNS server

It has the main database to perform read/write operation. More than one Primary Server can also be installed for Redundancy & Fault Tolerance. 

Secondary DNS server

This only has a copy of the main primary server database. It Established to balance the load on Server. It has a record taken from the Primary/Master Server in a specified time interval. So the record can only be read.

Whenever the DNS server gives the response to a query the response may be of four type


DNS Answer Types

Negative Answer:When a website address for which the client is querying is not available (Its IP address doesn’t exist) then this response will come negative.

Authoritative Answer: - The Server has the record of that website in its own Database. Our Local DNS Server will also be called Authoritative Server if it has the website record in its own Database.

Non-Authoritative Answer:- The DNS Server doesn’t have the record of that website in its own Database but it queries other DNS Servers or check in its own DNS Cache & brings the website's record.

Referral Answer:The DNS Server doesn’t have the record of that website in its own Database but it refers to another DNS Server for that.


DNS records 

I am covering only the important ones

  1.  A: Address mapping records give IPv4 address of a website
  2. AAAAAddress mapping records give IPv6 address of a website
  3. CNAME: Canonical Name record used to resolve alias name of a website like www.securitythread.com and securitythread.com are two canonical names of each other.
  4. PTR: Reverse-lookup pointer record work just opposite to A and AAAA record. This helps to map the IP address to the website name
  5. SOAStart of Authority records gives full detail about DNS zone
  6. NS: name server records give an authoritative name server for the given host
  7. MX: mail exchanger records give mail exchange server detail.
nslookup is a command-line tool that is used for querying the domain name system to obtain domain records.

commands:

nslookup securitythread.com > gives IP address

nslookup 8.8.8.8 > hostname of this IP

nslookup type=ns securitythread.com > gets ns record 

nslookup type=all securitythread.com > gets ns record 


DNS Zone 

A DNS zone is a database that contains resource records of a neighboring DNS namespace. for example, you have a DNS zone called securitythread.com inside the DNS server. where you create records for all networking devices. 

DNS Zone Types 

  1. Primary zone: which have the read/write permission on any records
  2. Secondary zone: This zone only have the read permission on records
  3. Stub zone: store copy of a zone that contains only records used to locate name server
  4. Active Directory-integrated zone: In this data is stored in active directory zone rather than in traditional zone field

DNS zone transfer 

Zone transfer is the process of copying the content of the zonal file from a primary DNS server to a secondary DNS server so that there is synchronization of records among primary and secondary. The primary zone server notifies to a secondary server when changes occur in zone database records.

Configuring the zone transfers

  1. Active Directory-integrated zone: In this type of DNS system server running on domain controllers can store their zones on active directory domain services because of this multiple masters can be created for DNS replication, therefore, any domain controller inside the running domain can write updates to the AD integrated DNS zones for the domain name. Active Directory-integrated zones store DNS zone data in the active directory database some replication occurs through an active directory of records.               
  2. Traditional DNS zone: the transfer take place between primary and secondary zones.

Methods of Zone transfer

  1. Full transfer of records: when both primary and secondary server is configured and secondary server responses all coming request from a full copy of the primary DNS server.
  2. Incremental zone transfer: when there are any new entries and the primary and secondary server databases are not the same as primary because of new entries, therefore, to make the synchronization among the databases of both the server incremental zone transfer takes place. This requires less bandwidth than a full transfer
  3. Active directory transfer: Occur when Active directory integrated zones are replicated to the domain controller in a domain.
  4. DNS notify: DNS notify the secondary DNS server when they needed to initiate a zone transfer so that the updates of primary DNS server can be replicated to them


Knowing Kali Linux for OSCP

Kali Linux is developed and maintained by the offensive security professional. It is a Debian-based Linux distribution focus at advanced Pen...