Showing posts with label Linux. Show all posts

Sunday, September 20, 2020

Knowing Kali Linux for OSCP


Kali Linux is developed and maintained by the offensive security professional. It is a Debian-based Linux distribution focus at advanced Penetration Testing and Security Auditing. All the programs packaged with the operating system have been evaluated for suitability and effectiveness. Kali contains several hundred tools that are geared towards various information security tasks, such as Penetration Testing, Security research, Computer Forensics, and Reverse Engineering.
Kali Linux comes with preinstalled most of the popular pentesting tools like Penetration Testing with Kali Linux Metasploit for network penetration testing, Nmap for the port, and vulnerability scanning, Wireshark for monitoring network traffic, and Aircrack-ng for testing the security of wireless networks.
This the reason why most of the hacker and pentester uses Kali Linux by offensive security. I know it is not to be the best distro for everyday use but for pentesting it is convenient, yes you could just download the tools on your other favorable distro but it might be just an unnecessary hassle for you.
Knowing Kali Linux for hacking if like "Give me six hours to chop down a tree and I will spend the first four hours on sharpening the axe ".The same relationship is seen between kali Linux with hacking.


How much to know for 'OSCP'


In Simple words more you know better for you, it is difficult to tell that how much you need to know, similarly like in our class exams we have a book from which we know the important topics to cover but at last, the question paper is decided by the examiner so going in the exam with this topics benefits you but for your 100% performance you know what to do. So let's understand each topic overview.


Friday, July 3, 2020

Configuring SMB(samba) client and server on CentOS 7


First, let's configure the Samba client on centOS

Open your machine terminal and start with installing smb client using yum
Command: yum install samba-client
Now to use CentOS as a client we must have another machine which acts as a server for our machine I choose Windows 7 you may choose another OS, a little bit of steps may change but the concept is the same almost.
Now in windows create your shared folder and assign the permission according to your purpose.
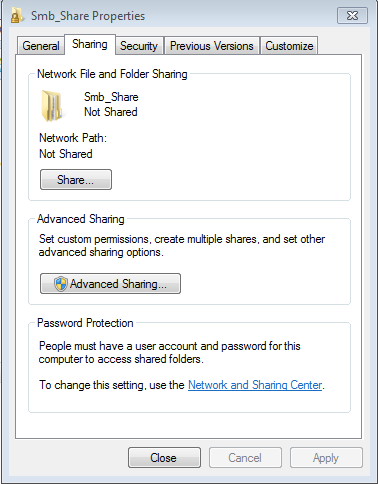
I created a folder inside my c drive named Smb_Share, then just right-click to properties to share the folder.


Sharing folder inside the network for smb

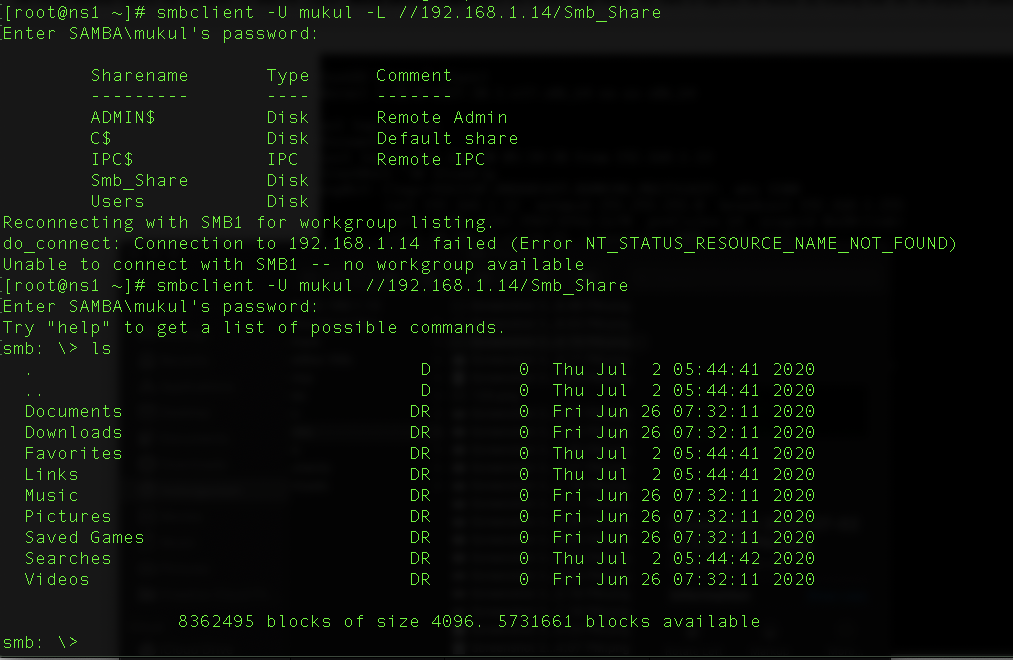
Now get back to your Centos Machine and type this command in terminal. smbclient -U mukul -L //192.168.1.14 where -U is for user and -L is for host


smbclient command

After knowing the folder name now we can directly access the folder using command smbclient -U mukul //192.168.1.14/Smb_Share


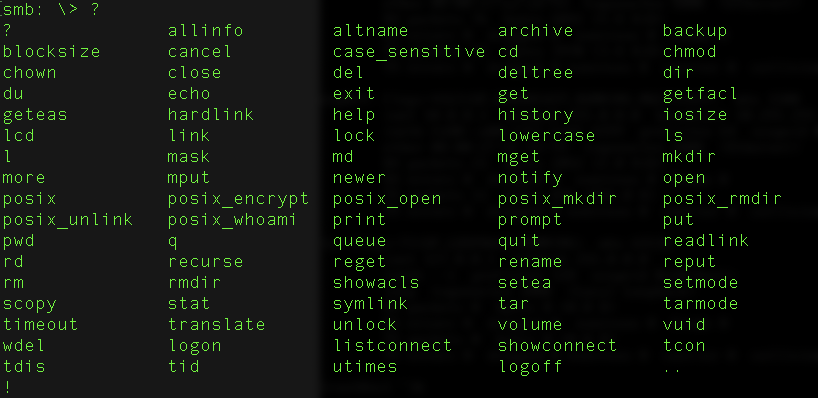
After getting inside the machine use “?” command to know different commands


help for Smb

use get command like get filename to download any file to our system and the important thing is that file downloaded inside the directory from which you make a connection like here I make a connection from /root directory so all file downloaded inside this directory.
if you have write permission then you can also use the mkdir command to make a directory inside the shared folder here I create a demo directory.


making directory in smb

Use can use the “mget” command to download multiple files from smb client.“Lcd” command is used for seeing current directory list like ls command in terminal.
put” command is similar to get command but instead of downloading it upload the file to the server. And for multiple files use “mput”(m=multiple).
del filename” command is used to delete the file “deltree Pictures\desktop.ini ” commands helps to delete the desktop.ini file so with deltree we can delete the directory inside the file.
Smbget” command if you know the file name then without making the whole connection you can use smbget to directly download the file. As shown in the image.
smbget -U mukul smg://192.168.1.14/Smb_Share/iecompat.dll


how to use smbget command in smb

All these methods are good only when your interaction with the shared folder is limited or maybe one or two times a day but what will happen if your interaction with the shared folder is on regular basis therefore sometimes network administrator mount the shared folder on system to make it easier for all to access it and sometimes users are not such qualified in all the things to make it accessible for all time. So the only solution remained to permanently mount the folder to the user system.
Before mounting we must know about Common Internet File System (CIFS) which is a network filesystem protocol used for providing shared access to files and printers between machines on the network. A CIFS client application can read, write, edit, and even remove files on the remote server.
To download it use: yum install cifs-utils
Now to mount : mount -t cifs //192.168.1.14/Smb_Share -o user=mukul,password=123 /mnt/data


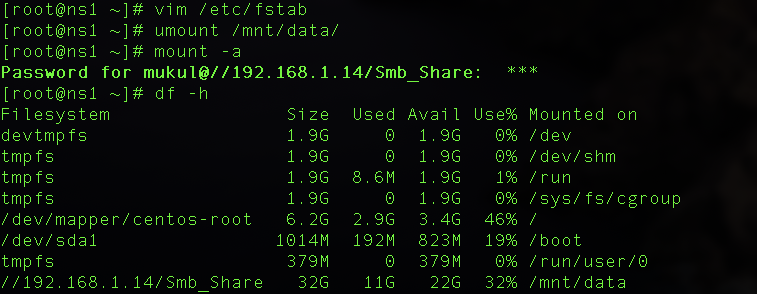
permanent mount

where the user is mukul and password is 123, -t type of file system which is cifs, the Smb_Share folder is mount to the /mnt/data folder. To verify it use the command: df -h
Now navigate to /mnt/data to the folder to see the mounted shared folder


The last thing remaining is to permanently mount the shared folder.


fstab file for permanent mounting

vim /etc/fstab use this command to open fstab file and edit this file like I showed in the above image. Here I use vim text editor you can use anyone and also you can add password just right to user=mukul but I choose not too. then just save and exit. type mount -a command to crosscheck. after this, if the machine restarts, the mounted folder remains mounted.


Configuring the samba(smb) on CentOS 7 and using the windows machine as a client.

Start with installing a package for samba: Yum install samba*
2. Create the shared folder and put the data inside it, which you wanna share. Gives permission to that folder according to your need. Like I create smb_data folder with permission 777 in a recursive manner but I suggest you to use 775 permission chmod -R 0775 smb_data/ just crosscheck with ls -lha command


creating folder for samba

3. Add the users which you want to access the data like I create smbuser1 then create its password and smbpassword for security purposes. For more users, you can make a group of people and add members to this group and assign permission accordingly.


adding user to access samba folder

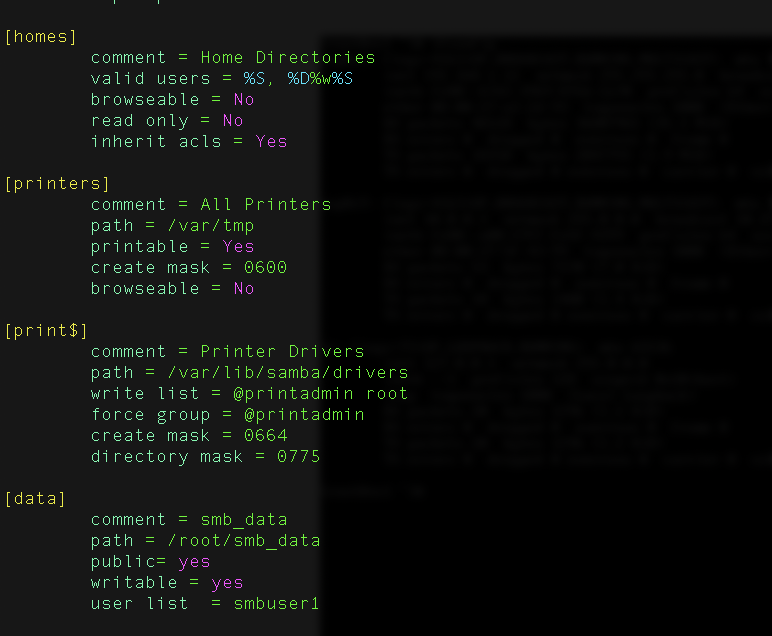
4. Now the main step is to edit the smb.config file inside /etc/samba/smb.conf using any text editor add these lines as shown in the image.
[data]
comment = smb_data
path = /root/smb_data
public= yes
writable = yes
user list = smbuser1


smb config file

here path decides the path of our shared folder, public=yes means available to people inside the network, writable means giving write permission, and user list the users which can access this shares folder.
5. Allow the port to make a connection with Windows machine you can use firewalld but I mostly prefer iptables so I edit vim /etc/sysconfig/iptables and allow 445 port then restart the iptables service using systemctl restart iptables.service and to check whether the port is open or not use iptables -n -L command
6. Just restart the smb service systemctl restart smb.service
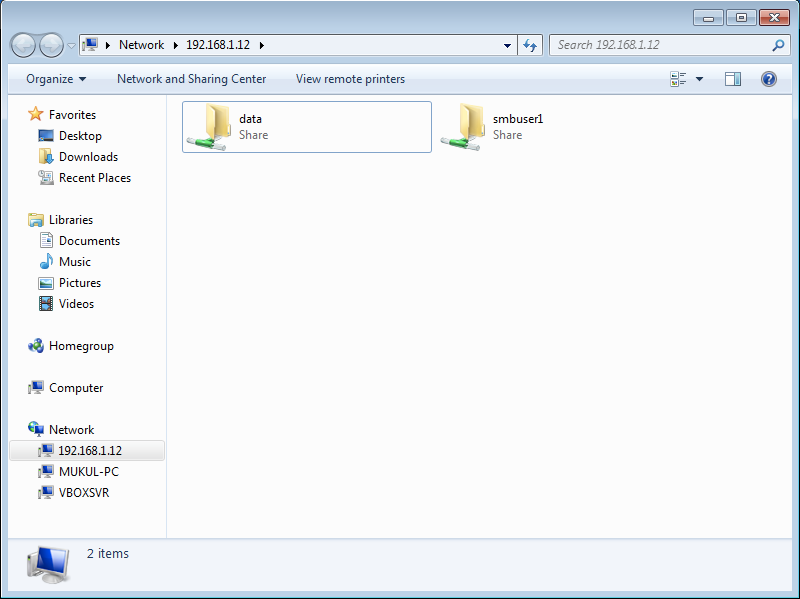
7. Now on client windows machine use run to access the shared folder by typing IP of centOS server \\192.168.1.12 and authenticate the smbuser1


run in windows

8. Now the most important step Enjoy because smbuser1 is here….


Thursday, June 18, 2020

Run Levels In Linux


Before understanding run levels lets understand the booting stages first. The following are the 6 high-level stages of a Linux boot process.

BIOS: basic input/output system, Perform some system integrity checks and executes the boot loader program.

2 MBR: Master boot record, loads and executes the Grub boot loader.

3 GRUB: Grand Unified Boot-loader, it loads the default kernel image as specified in the grub configuration file.

4 Kernel: Kernel executes the /sbin/init program.

5 Init: init executes run levels program.


6. Run-level programs: A run levels is a state or level of init process means A run-level can simply be thought of as the state your system enters like if a system is in a single-user mode it will have a run-level 1 while if the system is in a multi-user mode it will have a run level 5.


Linux relies on the run level to determine which services are started and which services are stopped. Run levels are identified by numbers. Run levels are numbered from 0 to 6, with each run level offering different services. Run levels 0, 1, and 6 are standard run levels reserved for special purposes. Run levels 2, 3, and 4 are used for whatever purpose you or your Linux distribution provider decide.


Init scripts


Init (initialization) is the program on Unix and Unix-like systems that spawns all other processes. It runs as a daemon and typically has PID 1.

The /etc/inittab file is used to set the default run level for the system. This is the run level that a system will start up on upon reboot. The applications that are started by init are located in the /etc/rc.d folder. Within this directory, there is a separate folder for each run level, eg rc0.d, rc1.d, and so on.


Example of  /etc/inittab file:  

Image via [https://geek-university.com/linux/runlevels/]


Depending on your default init level setting, the system will execute the programs from one of the following directories.

run levels 0 – /etc/rc.d/rc0.d/

run levels 1 – /etc/rc.d/rc1.d/

run levels 2 – /etc/rc.d/rc2.d/

run levels 3 – /etc/rc.d/rc3.d/

run levels 4 – /etc/rc.d/rc4.d/

run levels 5 – /etc/rc.d/rc5.d/

run levels 6 – /etc/rc.d/rc6.d/


Please note that there are also symbolic links available for these directory under /etc directly. So, /etc/rc0.d is linked to /etc/rc.d/rc0.d.


Under the /etc/rc.d/rc*.d/ directories, you would see programs that start with S and K.

Programs start with S are used during startup. S for startup.

Programs start with K are used during shutdown. K for kill.


When init starts, it looks for a line in /etc/inittab that specifies the default run level:

id : 2 : initdefault:


You can ask init to go to a non-default run level at startup by giving the kernel a command-line argument of single or emergency. Kernel command-line arguments can be given via LILO, for example. This allows you to choose the single user mode (run level 1).

While the system is running, the telinit command can change the run level. When the run level is changed, init runs the relevant command from /etc/inittab.


A system can be booted any of several run-levels, each of which is represented by a single-digit integer. Each run-levels designates a different system configuration and allows access to a different combination of processes.

There are differences in the run-levels according to the operating system. Seven run-levels are supported in the standard Linux Kernel. They are


ID

Name

Description

0

Halt

Shuts down the system.

1

Single-user mode

Mode for administrative tasks.[2][b]

2

Multi-user mode

It does not configure network interfaces and does not export network services.[c]

3

Multi-user mode with networking

Starts the system normally.

4

Not used/user-definable

For special purposes.

5

Start the system normally with appropriate display manager (with GUI)

Same as run-level 3 + display manager.

6

Reboot

Reboots the system.

Image via[https://en.wikipedia.org/wiki/Runlevel]


In addition to the standard run levels, users can modify the preset run levels or even create new ones if desired. Run levels 2 and 4 are usually used for user-defined run levels.

The program responsible for altering the run level is init, and it can be called using the telinit command. For example, changing from run level 3 to run level 5, which allows the GUI to be started, can be accomplished by the root (i.e., administrative) user by issuing the following command:    telinit 5


Booting into a different run level can help solve certain problems. For example, if a change made in the X Windows System configuration on a machine that has been set up to boot into a GUI has rendered the system unusable, it is possible to temporarily boot into a console (i.e., all-text mode) run level (i.e., run levels 3 or 1) to repair the error and then reboot into the GUI. The X Window System is a widely used system for managing GUIs on a single computer and on the network of computers.

Likewise, if a machine will not boot due to a damaged configuration file or will not allow logging in because of a corrupted /etc/passwd file (which stores user names and other data about users) or because of a forgotten password, the problem can be solved by first booting into single-user mode (i.e. run level 1).


The chkconfig tool is used in Red Hat-based systems (like CentOS) to control what services are started at which run levels. Running the command chkconfig - - list will display a list of services whether they are enabled or disabled for each run level.


In recent versions of Linux systems such as RHEL 7, the concept of run levels has been replaced with systemd targets.


Systemd 

Inittab is no longer used when using systemd


Systemd- system daemon is a new system that replaces the old “system V init” which gives all booting privileges to init generated process.systemd is developed and designed for better handling of dependencies and multitasking.

Systemd uses target instead of run levels, which supports our machine to keep track of all processes especially the daemon process(background running processes). The main purpose for develop this target based system is to perform parallel processing. All the new and popular Linux distribution such as Centos 7, RHEL 7.0, Fedora, and Arch Linux uses this


Runlevel

Systemd Description

0

poweroff.target

1

rescue.target

2

multi-user.target

3

multi-user.target

4

multi-user.target

5

graphical.target

6

reboot.target


By default, there are 2 main targets

  1. Multi-user.taget: Analogous to Runlevel 3
  1. Graphical.target: Analogous to run level 5
Inittab
via[https://landoflinux.com/linux_runlevels_systemd.html]


To view current default target run: systemctl -getdefault

And to change the default target:  rm /etc/systemd/system/default.target

Changing run level to 5:

ln -s /lib/systemd/system/runlevel5.target /etc/systemd/system/default.target


Then reboot system to  use runlevel5

Wednesday, June 3, 2020

SELinux In Linux Server CentOS 7


Security-Enhanced Linux
Security-Enhanced Linux 


Security-Enhanced Linux as its name suggests it is security enhancement in Red Hat distribution. As we know in Linux the main benefit is that we can modify the kernel according to our needs and make our own flavor.  So SELinux is a kernel module(Centos) with more security by more security I mean access control security.
Before the introduction of SELinux which works on Mandatory access control(MAC), Discretionary access control was used.
The DAC means the access control is based on the file owner and its permission. The root user has full access control with a DAC system.
If the system is a normal workstation then using the DAC may be a good choice but if it a Red Hat-based Linux server the use of DAC is not a good practice. Giving all access control to one user is not advisable. 
But after the MAC policy introduction by SELinux, there is an administratively prebuilt policy for access means if the DAC policy or its setting changes on the file, directory then SELinux policies are there to prevent the misuse of permission. Of course, SELinux gives flexibility to limit access between users for files, directory, and more. So, now comes the benefits of this hole thing we discussed, suppose you are running a Linux server(centos) with disable SELinux on it. if Your Linux server hosting many webpages and website, if any hacker can gain access through one of the vulnerability on these website vulnerabilities like 
1. Web ports HTTP(80) and https(443)
2. File transfer services FTP or proftpd
3. Through ssh service
4. Vulnerable plugin and theme installed on the website 
 After finding vulnerability first approach hackers is to put the shell inside the web server and gain the reverse shell to get the root access if we use old access policy like DAC then our hole server compromises and it makes easier for the hacker to do his job but with SELinux, there are some changes to protect our server. SELinux isolates the working of processes run by the local user to remove this type of chance of privilege escalation. The policies used by Mandatory access control are prebuilt we can’t change it but can make custom policy according to our needs.
 Configuration files of SELinux 
There are two methods to configure the config file SELinux 
   1. Using GUI: You can access GUI through   
                           system>Administrator>SELinux management
   2. Manually via config file
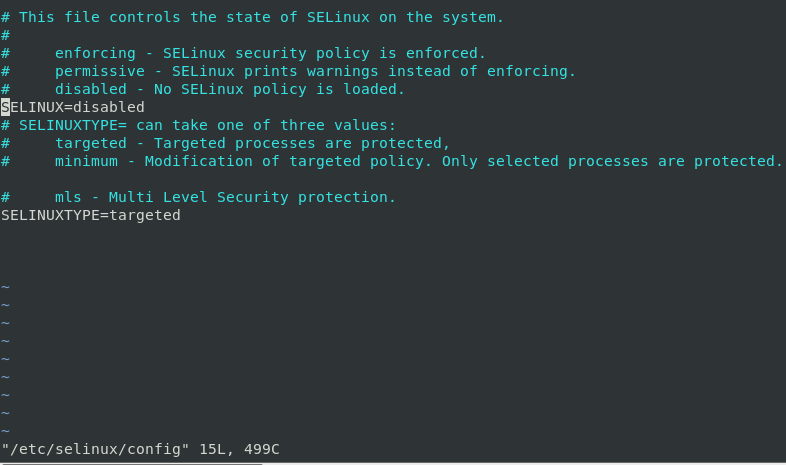
  You can directly access the config file using any text editor like vim   
 using the location /etc/selinux/config


command to edit config file
Command to edit config file 


After the modification in config file we need to reboot the system and after that login to your system and view the cat /var/log/messages if you do not see any error then all is fine and all MAC policy are implemented successfully but if you observer any error then the chances are policy is not implemented successfully.
When SELinux denies an action an Access vector is generated called AVC(access vector cache) which shows its message to /var/log/audit/audit.log and /var/log/messages, for troubleshooting use research to find any recent AVC messages.


config file of SELinux
Config file of SELinux


There are three basic mode for SELinux
Permissive: SELinux is enabled but the MAC policies that are not enforcing on the system only the warring to the user shows and a log of it displays.
Enforcing: The default mode, strict mode enabling all policies and restrictions on the system.
Disabled:  The default mode which is mainly present on the system, SELinux is off in this mode.
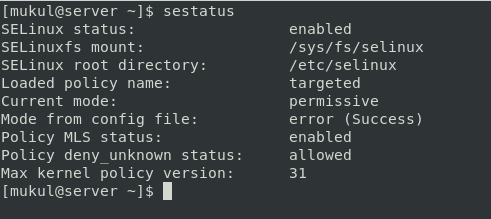
We can view the status of the current running mode of SELinux before editing the config file through “SEStatus” 


Status of  SELnix in linux server centos
SEStatus


Inside the config file, we also see SELINUXTYPE this option is used to set policy type which you want to use the default one is Targeted policy
Targeted:  default one which implements all the MAC policy(most restricted)
Minimum: Only selected processes are protected we have the liberty of modification of some  targeted made policy
Misserver follows Multi-level security protection to prevent users from obtaining access to information for which they don’t authorize.
SELinux Policy Overview:
In the SELinux policy, there are 700 main topics with approx. 10 lakh permission defined already inside “policy.config file”. It is a very large size life so it is obvious that policy ensures the safety of all services which run inside the system from this. It seems the local administrator cannot make such a huge policy himself for system security to satisfy the security needs.


after enabling selinux sestatus
Status file after enabling SELinux

SELinux policies are developed in such a manner that all applications cover at least one policy or more. The policy is design in such method that all measure which used to enable the service and configure the service is at his highest level if the user or any domain user wants to run the service apart from his scope user must have to change the policy means we can think that lowest policy privileges are given to the local user. SELinux policy is not only to protect user-level thread but also kernel-level thread and its classes.
SELinux supports a variety of access control models among them main focus was on extended type enforcement.


Type_enforcement_model_in_Selinux


 In the type enforcement model, set off operation represented by an object of any class with data types. Permission on each operation and its associated classes are different in fact each object of the different class have different permission on it then it is up to administrator how to manage permission of object of different classes.
The main difference between the old and new policy is set off rules that define the security and access right for process in the system. An SELinux predefined policy for users, group and other for accessing to roles, role access to their domain
SELinux introduced the predefined users, the users we create on the system are linked to one or more SELinux domain the basic roles of users are allowed to users plus one advantage is that process which is running by the local user are mapped to the predefined policy or we can say role allowed to the user. The definition of role in SELinux policy defines which users have access right to what role.
Sometimes, the pre-built policy makes hard for administrator and local users to use the system and resolve an issue regarding policy therefore the only remaining option is to choose permissive SELinux mode.


Knowing Kali Linux for OSCP

Kali Linux is developed and maintained by the offensive security professional. It is a Debian-based Linux distribution focus at advanced Pen...